| ||||
| AAB Departments |
| ...Beer Features |
| ...Beer Talk |
| ...Pull Up A Stool! |
| ...What's Brewing |
| ...Beer Travelers |
| ...Stylistically Speaking |
| ...Beer & Food |
| ...Homebrewing |
| ...Collectibles |
| ...Marketplace |
| Beer Lovers' Resources |
| ...World Beer Festival |
| ...Brew Cruise Info |
| ...AAB Merchandise |
| ...AAB Bookstore |
| ...Beer Links |
| About the Magazine |
| ...Subscription Info |
| ...Retail the Magazine |
| ...Advertising Info |
| ...Contact AAB |

|

Building an immersion chiller
This article is an excerpt from the book "Brew Ware" by Karl Lutzen and Mark Stevens, illustrated by Randy Mosher, published by Storey Publishing, 1996. It appears here with permission of the authors and the publisher.
Wort chillers are used to quickly cool the hot wort after boiling. Rapid wort cooling is important to the making of good beer. It helps to reduce the formation of off-flavor compounds and it allows the brewer to add the yeast to the wort more quickly, thereby reducing the chances for bacterial spoilage. This article describes the most common type of wort chiller, the immersion chiller.
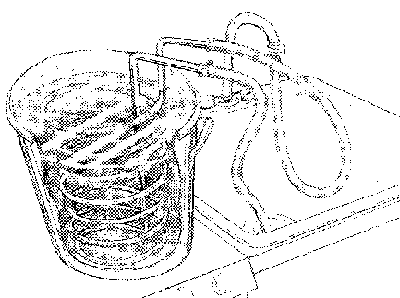
Immersion chillers are usually built from a coil of copper tubing with connectors on each end to which hoses are attached (garden hoses are often used). One connector is run to a source of cold water; the other is run to a drain for expelling the hot water. The immersion chiller offers a simple, effective way to quickly cool hot wort.
Basic immersion chiller
Chillers are readily available from many homebrew supply shops for $30 to $35; however, they can also be built at home for a bit less than that. One advantage to building the chiller yourself is that you can adapt the plans to suit your own needs. We'll describe a few ways that chillers can be adapted to work more effectively.
When you build a wort chiller, the most critical aspect is the tubing you choose. Copper works well because it efficiently transmits heat energy and is readily available at fairly low cost. Stainless steel tubing would work, but it costs more. Aluminum also works fine, but some brewers feel that it tends to give the beer a metallic taste. There is, however, no real evidence of such flavor problems.
Your tubing should be 3/8 inch diameter. If you use a thinner tube, you will achieve potentially greater efficiency because the thinner tube gives you more surface area per volume. However, chillers made from 1/4 inch diameter tubing tend to take much longer to cool wort and are prone to clogging. Using 3/8 inch diameter tubing gives you good efficiency and acceptable cooling times, and it avoids clogging.
Materials for a Wort Chiller: 25' of 3/8" diameter copper tubing Two hose clamps One inexpensive garden hose (25' or shorter). (Editor's Note: If you are using the chiller indoors, you might want to attach the chiller to a regular sink faucet. If so, you might want to think about purchasing an inexpensive bathtub/shower converter. Just cut off the shower head and use the hose on the "water in" side of your chiller)
Note that lengths of copper tubing usually comes in a large coil. Most hardware stores will want to sell you a full box containing 50' to 60' of tubing. If money's not an object, you can make a chiller using a full coil of tubing. Alternately, shop with another homebrewer and build two wort chillers or find a hardware store that will cut your tubing to order.
Before you begin, you should know that it is easy to crimp copper tubing causing an obstruction. With care you can complete the chiller without any crimping, but if you're worried about the possible loss of your tubing, buy a spring tubing bender at the hardware store. It will help make the 90 degree bends without crimping the tubing.
One other point: You should plan to leave enough copper tubing on the ends so that they stick out over the sides of the pot. Once in a while you may get leaks from loose hose clamps; if the tubing-hose connection is outside the pot and it does leak, the water will not drip into the wort.
Directions:
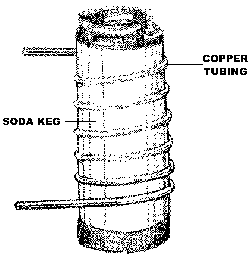
 1. Turn the copper tubing into a coil. If the tubing came as a large coil, you can wind it into a tighter coil by hand. This is done by holding one end and turning the coils into ever-smaller coils. It may be helpful to find a solid round object that you can wind the coil around. A soda keg is handy, but other items such as a two-pound coffee can or the bucket from an ice cream maker can do just as well. Simply wrap the tubing around the container, laying each coil right next to the previous one. Leave about 18" to 24" on one end. The final diameter must be small enough so there is at least 2" between the interior sides of your brewpot and the coil.
2. Bend the short end of the tube at the top of the coil 90 degrees out from the coil.
3. Bend the longer end 90 degrees so that the length of the tube goes back up toward the top of the coil.
4. Bend the top part of the long length out from the coil.
5. Cut the garden hose so that each length is at least 5 or 6 feet long.
6. Slide a clamp over each cut end of the hose.
7. Slip one hose length over one end of the coil. Repeat with the other end.
8. Tighten the clamps to hold the hose lengths firmly to the coil.
That's it! Your immersion chiller is ready to use, and it should have cost you less than $25.
We recommend testing the chiller before brewing a batch of beer, just to convince yourself that everything works and to satisfy yourself that there will be no surprises when the time comes to press the chiller into service. We tested our chillers by boiling a brewpot full of water, to which we added 1/2 gallon of vinegar, and seeing how long it would take to cool it. The vinegar is important because it will clean the outside of the chiller and prepare it for use in the wort.
In addition to the chiller, you will need a hose that's long enough to run from your faucet to the chiller. If you're using the chiller in your kitchen, as most people do, you may need to twist off the end of your faucet to reveal the threads. These threads should accept a standard hose fitting, but many kitchen faucets need a threaded adapter to accept a hose connection. These are available at most hardware stores for $1 to $2. Some homebrew supply shops also sell the adapters. If you can't get the end of your faucet off, or if you just don't want to mess with it, you may be able to find a rubber adapter that will fit over the end of the faucet, avoiding the need to unscrew the faucet sprayer. One of these adapters is the shower hose attachment that Jack Schmidling Productions includes with the EasySparger.
Our chiller has one length of hose long enough to run from our sink faucet to the brewpot, and another long enough to carry the heated water to the drain. They typical chiller from a homebrew supply shop comes with lengths of hose that are only a few inches to a foot in length. You could make your hose lengths that short on this chiller too, but if you do, you will need to get two more hoses to use when brewing to carry the water to the chiller and then to carry the hot waste water back to your drain. Keep an eye on the end of the hose in the sink, or use something to hold it in place. A loose hose end can make a real mess. By using long lengths of hose, we've avoided the need for extra hoses, although our chiller is a bit more cumbersome to store. As we've said before, homebrewing equipment and gadgets always involve trade-offs.
When you're ready to use the chiller, sanitize it by setting it down into your brewpot 15 to 20 minutes before the end of the boil. The heat will destroy any bacteria or other microorganisms on its surfaces. Then when the boil is done, simply attach the hose to your faucet. Five gallons of wort should cool from boiling to below 80 degrees F in about 15 to 20 minutes. The time will depend on the flow rate and the temperature of the water.


